|
 
 
V3 Assembly Steps: 0 1 2 3 4 5 6 7 8 9 10 11 12 13 14 15 16 17 18 19 20 21 22 23 24 25 26
27

Thank you for purchasing an ArduiNIX V3 Nixie Tube Display driver shield! The following tutorial will help you assemble and test your ArduiNIX. Please follow each step carefully, check your work, and practice safe operation when finished.
Your kit will include the following components along with the V3 Mainboard:
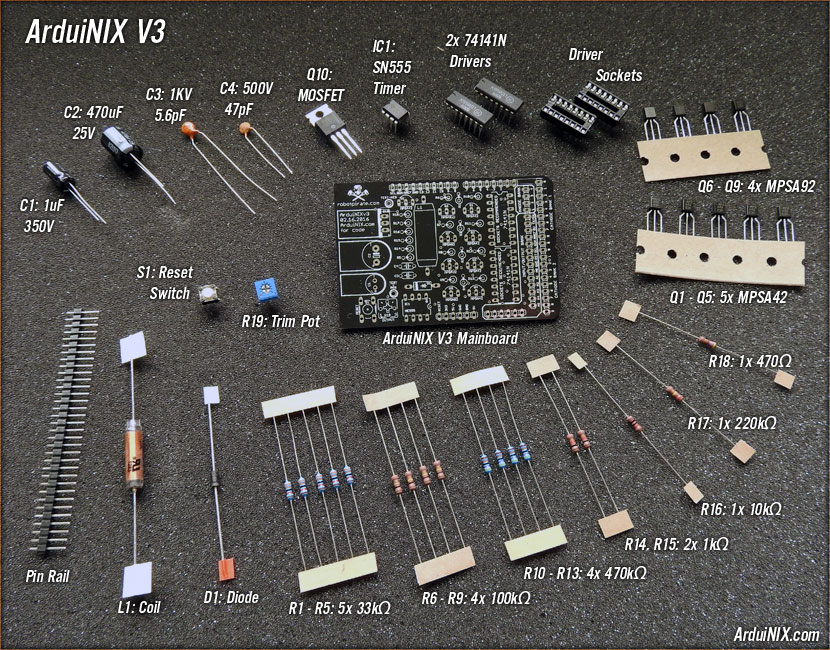
Special note: As manufacturers sometimes discontinue or change the appearance of some components, the parts you recieve may differ from the photo above. However. If there are any missing parts, or questions, please contact us.
You could assemble the shield just based on the chart below, but if you'd like a step by step tutorial, please go on to the next steps.
Step |
Location |
Part Name |
|
|
L1 |
100uH 1 Amp RFI Suppression Coil |
|
|
D1 |
Damper Diode 1.0 Amp 400V BYT01-400 |
|
|
C1 |
350 Volt 1 uF Capacitor |
|
|
C2 |
25 Volt 470 uF Capacitor |
|
|
C3 |
500V 5.6pF OR 47pF NPO Capacitor |
1 |
|
C4 |
500V 47pF SL Capacitor |
1 |
|
Q10 |
IRF730 400V 5.5 Amp SingleGate MOSFET |
1 |
|
R19 |
1/4" Squ 1K 10% Single Turn Trimmer |
|
|
S1 |
6X6 FLAT 4.3mm BTN Tactile Switch |
|
|
IC1 |
General Purp Single NE555N Timer IC |
|
11 |
R1-R5 |
1/4watt 33Kohms 5% Metal Film Resistors |
5 |
|
R6-R9 |
1/4watt 100Kohms 5% Metal Film Resistors |
4 |
|
R10-R13 |
1/4W 470K ohm 1% Metal Film Resistors |
4 |
|
R14, R15 |
1/4watt 1Kohms 5% Metal Film Resistors |
2 |
|
R16 |
1/4watt 10Kohms 5% Metal Film Resistors |
1 |
|
R17 |
1/4watt 220Kohms 5% Metal Film Resistor |
1 |
|
R18 |
1/4watt 470ohms 5% Metal Film Resistor |
1 |
|
Q1-Q5 |
NPN MPSA42 Small Signal Transistor
|
5 |
|
Q6-Q9 |
PNP MPSA92 Small Signal Transistor |
4 |
22 |
IC2, IC3 |
Nixie Driver IC - SN74141 *OR* Equivalent |
2 |
| |
|
|
|
| |
|
|
|
| |
|
|
|
|
Pinrails |
40P .100" Pin Strip Headers |
1 |
V3 Assembly Steps: 0 1 2 3 4 5 6 7 8 9 10 11 12 13 14 15 16 17 18 19 20 21 22 23 24 25 26 27
|